If you want to learn more about your garden soil, the best place to start is with a soil test kit.
I’ve tried out all the most popular soil test kits on Amazon, and here, I’m sharing which ones are worth your money.
Table of Contents
 Best Soil Test Kits
- Best Complete Testing Kit: Luster Leaf 1601 Rapitest Test Kit
- Best Soil pH/Acidity Test: Garden Tutor Soil pH Test Kit
- Best Moisture, Light, & pH Meter: Sonkir Soil pH Meter 3-in-1
- Best Budget pH Test: Garland Soil pH Tester
⭐ Reviews – Best Soil Test Kits 2026
The Luster Leaf 1601 Rapitest Test Kit was the best overall soil test kit that I tried, testing for everything in one: soil pH, nitrogen, phosphorous, and potassium.
⚙️ How it Works
I liked the design of this testing kit more than the others I tried. There are four test containers: a green one for pH, a pink one for nitrogen, a blue one for phosphorous, and an orange one for potassium. Each container comes with 10 test capsules, which are the same colour as the container so you know which one goes where.
The instructions are easy to follow and are slightly different depending on whether you’re testing the pH or nutrients in your soil. The pH test involves adding soil to the fill line, pouring the contents of a capsule into the container, using the dropper to add water, and shaking the solution. The nutrient tests involve filling a clean container with soil, allowing the solution to stand, adding it to test and reference chambers, pouring in the contents of a capsule, and shaking the solution.
In all four tests, the solution will change colour, and the shade of the colour will indicate the pH (from 4.5 to 7.5) or the concentration of a particular nutrient (depleted, deficient, adequate, sufficient, or surplus).
👍 What I Liked
I appreciated the fact that the test instructions clearly explained how long I should let the soil solution stand for the nutrient tests based on the soil type – I have clay soil, so decided to leave it for 24 hours before continuing with the test.
I also found the instructions on how to raise or lower soil pH, and the pH preference booklet for 450+ plants, a nice extra touch. Rather than just knowing my results, the test kit gave me the knowledge to actually be proactive with them.
👎 What I Didn’t Like
My overall experience using this soil test kit was positive, but there are still a few setbacks I want to mention.
First, like all DIY rapid tests, the results are a bit vague. I couldn’t use the test to determine the exact concentration of nutrients in my soil. But I think for most people, simply knowing whether their soil could do with more or less of a certain nutrient is enough – and in this respect, the test delivers.
Also, I found opening the capsules over the tiny chambers a bit fiddly, and some of the powder inevitably ended up spilling onto my table. I don’t think this affected the results, but it’s worth noting that the capsules are filled to the brim, so be careful with this process.
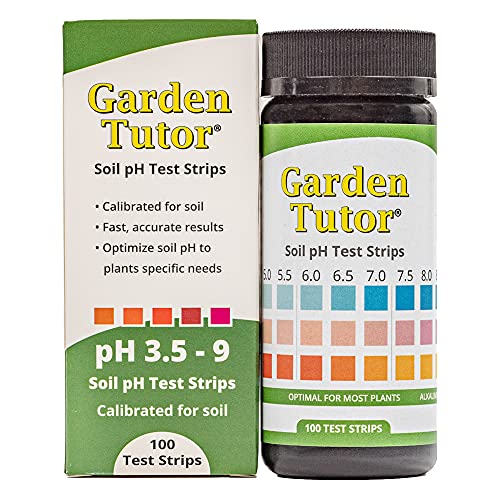
If you just want to test your soil’s pH level or acidity/alkalinity, I recommend using the Garden Tutor Soil pH Test Kit.
⚙️ How it Works
This is one of the easiest-to-use soil tests I’ve tried. It consists of soil pH test strips that you can simply dip into a solution of soil from your garden and water (this solution should be left up to 8 hours to settle beforehand), then wait for the squares at the end of the strip to change colour.
You can then use the included colour chart to get a read of your soil pH, from 3.5 (very acidic soil) right up to 9.0 (alkaline soil).
👍 What I Liked
I definitely enjoyed the fact that I didn’t have to do anything fiddly for this test, and once I’d given the soily water time to settle, the results were almost instantaneous.
I also liked the quality of the reading material that came with the kit. A detailed full colour pH testing handbook is shipped with the test, and this includes lime and sulfur application charts that you can use if you’re needing to increase or decrease your soil’s pH level.
👎 What I Didn’t Like
As with the Luster Leaf test, this Garden Tutor test doesn’t deliver highly accurate soil test results. Yes, it’ll give you a rough understanding of your soil pH, but to get exact results, you’d need to pay for a comprehensive lab test.
I also found it quite difficult to differentiate between the different colour shades on the test strip when comparing it to the colour chart, especially as my test strip was dirty from dipping in the soily water. But as I said earlier, I think knowing roundabouts where your soil lies on the pH scale is sufficient.
If you want to measure your soil moisture, light, and pH without the effort of a “science lab” style test kit, the Sonkir Soil pH Meter 3-in-1 is the solution for you.
⚙️ How it Works
This soil tester is really easy to use and doesn’t require batteries. You just stick the probe into the soil you want to test, then toggle between the different measurements (light, moisture, and pH).
All the readings are projected on the same display screen, and the bar will move from left to right to tell you whether your soil is more acid or alkaline, whether it’s dry or moist (on a scale of 1 to 10), and the light intensity (from 0 to 2000 LUX).
👍 What I Liked
The biggest bonus of using this pH, light, and soil moisture meter was that I didn’t have to dig any soil out of my lawn, mix any powder, or compare a test strip to a colour chart. I could just dip the strip into an area of well-watered soil and get the results instantly.
I also liked that the device is just 11.5 inches tall and 2 inches across, making it compact enough to store in a drawer or cupboard without dominating space. The lack of batteries is another benefit given that we’re now in an era where most of us no longer have a drawer full of spare batteries at our disposal.
👎 What I Didn’t Like
The pH reading was similar to the other soil tests I tried, but some people said that the pH level didn’t change at all when they inserted the probe into the ground, leaving them to question the accuracy of the meter.
The meter also gets rusty quite quickly, and I think it’s a shame that it doesn’t come with an abrasive cleaner to remove any odixisation and keep it clean and working properly for longer.
The Garland Soil pH Tester is the soil testing kit I recommend for people who want to test soil pH without spending any more money than necessary.
This kit costs just under £7 (at the time of my review), so it’s a great budget-friendly option.
⚙️ How it Works
This is another powder test, but the powder comes included in the container rather than in a capsule.
You have to mix the powder with a soil sample and water (ideally distilled water, which you can buy in bottles at any supermarket).
Once the solution changes colour, you can match it to the included colour chart, giving it a pH reading from 5.00 to 8.00.
Again, depending on the soil type, you might have to leave the solution up to 24 hours to settle to get the most accurate results.
👍 What I Liked
This pH testing kit delivered exactly the results I needed for less than £10. If you just want to test your soil’s pH once or twice and you don’t want to spend a fortune, I recommend this kit.
I also found the instructions easy to follow, and there isn’t really any way to make a mistake, so you should get fairly accurate results.
👎 What I Didn’t Like
Comparing the colour of the solution to the colour chart could have been easier. I found it quite difficult to interpret the solution’s colour and ended up leaving the solution a few hours to get a good colour match.
You get two tests included, which is great, but the kit doesn’t offer the same value for money as kits that provide dozens of test strips for testing your soil again and again.
🧾 6 Things To Consider When Choosing The Best Soil Test Kit
To make sure you buy exactly the right soil testing kit for you, I recommend considering the following things first:
🔎 What You Want to Test (pH, Soil Moisture, Light Levels, Nutrients?)
Start by determining what you want to test.
Here’s why you might want to test for the different soil parameters:
Soil pH levels affect nutrient availability, microbial activity, and plant growth, so testing your soil pH can help you to determine whether or not it’s optimal for growing grass or plants.
Assessing your soil moisture levels helps you to know how much irrigation (if any) it needs.
For indoor plants or areas with limited sunlight, testing light levels can help ensure your soil has access to adequate lighting for plant growth.
Finally, testing your soil for essential nutrients such as nitrogen, phosphorus, and potassium helps you to get a good understanding of its fertility and determine whether or not you need to fertilise it, and with what type of fertiliser/NPK ratio.
If you’ve never tested your soil before, I would recommend testing for everything first, so you can get a comprehensive understanding of your soil parameters from the beginning.
📑 Testing Method
Also consider the testing method that the kit uses.
Some kits use colourimetric methods, where a colour change indicates the soil parameter levels. This could be in the form of a test strip that you dip into a soil-water mix, or a powder that you mix into the soily water. You can compare the colour to the included colour chart to get a reading.
Other tests use electronic sensors or probes for measurements, and they display the reading on a digital screen.
Choose a testing method that aligns with your comfort level and the amount of effort that you want to put into conducting a soil test.
🤏 Accuracy and Precision
DIY tests aren’t as accurate as lab tests, but most people won’t want to spend any more than £20 on a soil test kit.
Even so, it’s best to look for a DIY test that will deliver the most accurate and reliable results. A good way to determine this in advance is to read reviews and customer feedback, as I’ve noticed that many customers talk about the accuracy of a test kit as part of their reviews.
Generally, digital meters are more precise than chemical test kits, but both should provide consistent and repeatable measurements when they’re used correctly.
💪 Ease of Use
The ease of using a soil test kit depends on the type of kit you buy. Most soil test kits need you to mix a powder with soily water, which is pretty easy, but time-consuming – you have to leave at least 30 minutes for the mixture to settle.
If you want the easiest testing option, go for a digital test meter. This will give you near-instant results, and you won’t have to take a soil sample or add anything to it – it’s as simple as inserting the probe into the soil you want to test.
Many manufacturers share an image of their instructions on the product page, and I recommend looking for kits with clear instructions and straightforward test procedures for your convenience.
🔢 Number of Tests
Next, determine how many tests you want to do, and whether it might be buying a multi-test kit (these are often a better value for money than single-test kits).
The product description should mention the number of tests included in the kit.
Some kits offer multiple tests for different parameters, while others offer multiple tests for the same specific measurements. Some offer only single tests for one parameter.
Consider the size of your garden or lawn and the frequency of testing when choosing how many tests you need.
💰 Cost
Finally, compare the cost of different soil test kits and consider the value they offer in terms of accuracy, features, and included tests.
More advanced kits typically come with a higher price tag, but they provide a more comprehensive soil analysis, which you might be looking for.
I’ve found that most DIY soil test kits cost £8-£25. It’s not usually worth paying more than this unless you’re investing in a really comprehensive test or a big multipack of tests.
Important note: this review was last updated in January 2026. We apologise if pricing or availability has since changed for any of the products mentioned above.


